Font Subsetting with Eleventy.js
planted on in: 11ty and Typography.
~2,509 words, about a 13 min read.
For a while now PhotoGabble has used the default monospace system font for all typography; this was initially a stop-gap measure in order to quickly ship the blog and ever since I have wanted to update with a more bespoke font choice that enhances readability[1].
The problem with font choice is that it's huge and a lot of the font's that I ended up liking cost a lot of money[2]. Early on I decided that I would only use free type faces and ideally focus on those that where open source. After a great deal of searching I ended up with a list containing just two fonts:
- Atkinson Hyperlegible Font by the Braille Institute
- Iosevka by Belleve Invis
Given my preference for monospace I settled for using Iosevka; it provides two quasi-proportional families: Iosevka Aile and Iosevka Etoile which have been made for documents and feel more readable to my eyes than the default monospace I had been using while retaining the distinctive feel that I like in monospaced fonts.

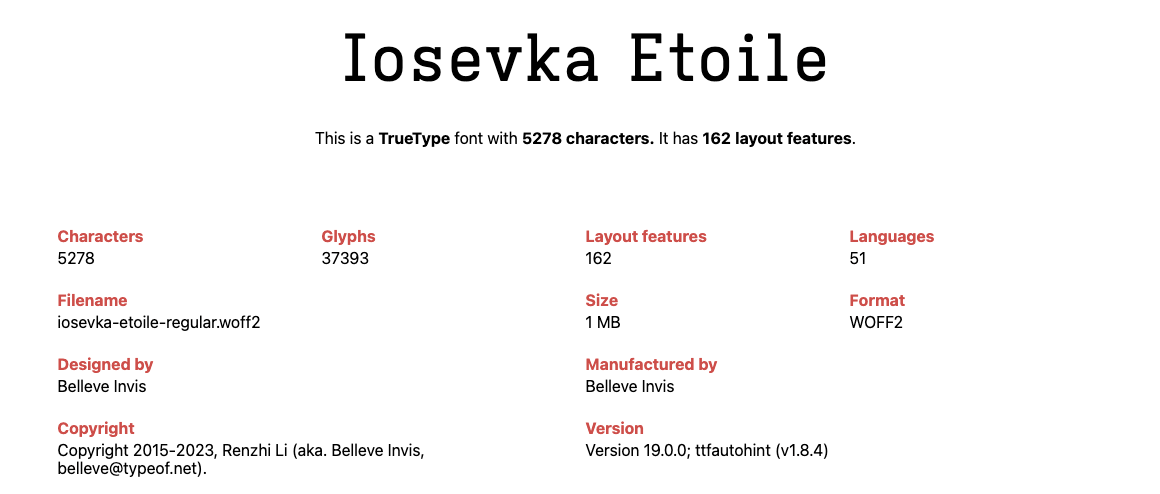
Fig 1. Using wakamaifondue we can see a lot of supported glyphs that I'm not going to be using...
I finally settled upon using the quasi-proportional slab-serif Etoile, however out of the box the woff2 file is 1.3MB in size and as you can see in fig 1 above this is because it contains an impressive number of glyphs, support for languages and layout features - a lot of which will go unused on this website.
Building Iosevka from Source
In an attempt to solve the filesize issue I decided to build Iosevka from source using the Iosevka Customizer. Building from source isn't too difficult, it requires you have at least node v14 installed and ttfautohint. I used homebrew to install ttfautohint with the following brew command:
$ brew install ttfautohint
Then it was a case of following the instructions for building Iosevka from source using the following toml file the Customizer produced:
[buildPlans.iosevka-custom]
family = "Iosevka Custom"
spacing = "quasi-proportional"
serifs = "slab"
no-cv-ss = true
export-glyph-names = false

[buildPlans.iosevka-custom.weights.regular]
shape = 400
menu = 400
css = 400

[buildPlans.iosevka-custom.slopes.upright]
angle = 0
shape = "upright"
menu = "upright"
css = "normal"
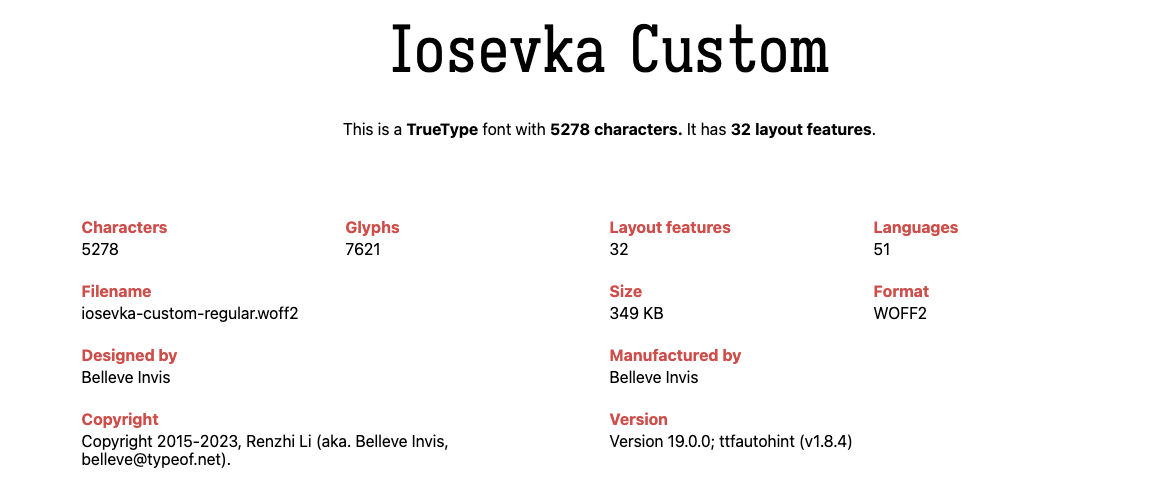
After a couple of minutes of processing the result was a woff2 file weighing 349KB. A 71.73% decrease in filesize is impressive but 349KB is still to heavy for my liking and checking the built font using wakamaifondue shows it contains a lot of Glyphs that again I don't necessarily need.

Fig 2. A large reduction in size but still too heavy for my liking
Above I have only built the regular typeface however for this website I will need four typefaces: regular, italic, bold and bold-italic. If serving one 249KB font file doesn't go against my mantra of minimalism serving four of them certainly does. I needed to find a way of reducing the filesize further. Enter stage right, subsetting!
Content-Based Subsetting
For the unaware, subsetting is the practice of creating a "subset" of a font that contains a custom collection of glyphs. Due to their limited nature the resulting font file will be vastly smaller than the source its based upon.
Because this website is statically generated with zero dynamic content I can create a super-targeted subset that only contains the characters known to be used. This process is very similar to PurgeCSS and similarly needs to be done each time the content changes, something that can be automated at build time and restricted to only happen during a production build so as not to slow down development build times.
To familiarise myself with subsetting I read Paul Herbert's 2022 post on Font Subsetting Strategies; Paul makes use of Glyphhanger to scan for unique glyph usage and produce the subset font. There is also available the subfont tool which appears to do the same.
Both have a dependency upon Pythons fonttools library in their usage of pyftsubset and therefore add Python as a dependency into your build pipeline; the Netlify build environment supports Python so hopefully this shouldn't be a problem, although at time of writing I haven't tested subsetting in the build pipeline.
Automating Subsetting with Eleventy.js
Because I am using 11ty to generate this website I have programatic access to all content during build time. Therefore, I decided to use pyftsubset directly and write a small #11ty plugin for automating content based subtetting:
module.exports = function (eleventyConfig, options = {}) {
  const glyphs = {
    chars: new Set(),
    add(text) {
      for (let char of text) {
        if ([' ', "\n", "\r", "\t"].includes(char) === false) {
          this.chars.add(char);
        }
      }
    },
    getUnique() {
      const out = Array.from(this.chars);
      out.sort();
      return out.join('');
    }
  };
  eleventyConfig.addTransform('identifyGlyphs', (content, outputPath) => {
    if (outputPath.endsWith('.html')) glyphs.add(content);
    return content;
  });
  eleventyConfig.on('eleventy.after', async () => {
    console.log(glyphs.getUnique());
  });
}
From the above you can see that the identifyGlyphs transformer passes the content of all html files to the glyphs.add method; this splits the text up into characters and adds them to a JavaScript Set. I'm using a Set here because it only allows values to occur once and therefore acts as a peformant method of deduplicating.
By the time the eleventy.after event triggers the chars set will contain all unique characters used in all generated html files and we can use the glyphs.getUnique to give an idea of what characters we are using.
Running the above gives me the below lovely output of every unique character that PhotoGabble uses (at time of writing):
!"#$%&'()*+,-./0123456789:;<=>?@ABCDEFGHIJKLMNOPQRSTUVWXYZ[\]^_`abcdefghijklmnopqrstuvwxyz{|}~ £°×áåèéíóöøüğŁΑμ‑–—’“”…→↗↩∀≈≤≥─┌┐└├▁▂▃▄▅▇█✖🌱🌳🌾🌿👩📖😅🙄🧵︎️゚
At this point we could pass that through to pyftsubset using its --text option flag which allows us to specify characters to include in the subset, as a UTF-8 string. However, I am going to opt for using the --unicodes option flag which allows us to specity unicode ranges; this will become clear when I discuss potential issues later on.
In order to convert our UTF-8 string into unicode ranges we will need to install the CharacterSet JS Library; I am using version 2.0 of this library which only supports ESM. This is a problem because Eleventy.js at time of writing only supports CommonJS. There is however a way around this because Node does support import:
eleventyConfig.on('eleventy.after', async () => {
	const CharacterSet = await import('characterset');
	const cs = new CharacterSet.default(glyphs.getUnique());
	console.log(cs.toHexRangeString());
});
Running the plugin with the above changes results in the following Unicode Ranges being output in place of the UTF-8 string:
U+21-7E,U+A0,U+A3,U+B0,U+D7,U+E1,U+E5,U+E8,U+E9,U+ED,U+F3,U+F6,U+F8,U+FC,U+11F,U+141,U+391,U+3BC,U+200D,U+2011,U+2013,U+2014,U+2019,U+201C,U+201D,U+2026,U+2192,U+2197,U+21A9,U+2200,U+2248,U+2264,U+2265,U+2500,U+250C,U+2510,U+2514,U+251C,U+2581-2585,U+2587,U+2588,U+2716,U+FE0E,U+FE0F,U+FF9F,U+1F331,U+1F333,U+1F33E,U+1F33F,U+1F469,U+1F4D6,U+1F605,U+1F644,U+1F9F5
Now we have everything needed to invoke pyftsubset this is done via the following signature pyftsubset {filePathname} --unicodes={usedGlyphsList} --flavor=woff2 which we will call via Node's child_process spawn mechanism.
const { spawn } = require('node:child_process');
const path = require('node:path');
const fs = require('node:fs');

const rootPath = (p) => path.resolve(process.env.ELEVENTY_ROOT, p);

module.exports = function (eleventyConfig, options = {}) {
	if (options.dist) eleventyConfig.addPassthroughCopy(options.dist);

	// glyphs const from above unchanged

	eleventyConfig.on('eleventy.after', async () => {
		const CharacterSet = await import('characterset');
		const cs = new CharacterSet.default(glyphs.getUnique());

		const unicodeHexRange = cs.toHexRangeString();
		const rootDist = options.dist ? rootPath(options.dist) : false;
		const srcFiles = (options.srcFiles ?? []).map((src) => {
			const info = path.parse(src);
			const dir = rootDist ? rootDist : info.dir;
			return {
				src: rootPath(src),
				dist: `${dir}/${info.name}.subset${info.ext}`
			}
		});

		const promises = [];
		for (const file of srcFiles) {
			promises.push(new Promise((resolve) => {
				const buildProcess = spawn(
					"pyftsubset",
					[
						file.src,
						`--output-file=${file.dist}`,
						`--unicodes=${cs.toHexRangeString()}`,
						'--flavor=woff2',
					],  { stdio: "inherit" }
				);
				buildProcess.on('error', (err) => console.error(err));
				buildProcess.on("close", () => resolve());
			}));
		}
		await Promise.all(promises);
	});
}
The above is missing caching to stop it running upon each build, an enable flag for programmatically disabling its runs (e.g only run subsetting in development) and a check for existing subset files, so we only replace missing but essentially that is all there is to automatically subset your fonts based upon your 11ty website's content.
I have tidied this up and published it as an Eleventy.js Font Subsetting Plugin. In the near future I shall be updating this tutorial with additional techniques.
Some people have suggested not using a monospace font for the longform text due to it being harder to read ↩︎
For example, Berkeley Mono Typeface is $75 for the non-commercial developer license or starting at $295/year for commercial use ↩︎